In developer orgs/sandboxes you can very easily enable or disable triggers but as soon as you deploy your trigger to production org it won’t allow you to make any changes in the trigger. That’s the reason many times we(developers) get screwed when the trigger creates any problem in production when the client is doing a bulk update to data. We can not disable the trigger in production. The only way to save this type of situation is to re-deploy the trigger in disabled status.
We can avoid running into this type of issue if we manage our triggers wisely at the time of development, I will be showing here a very primitive type of trigger handler to give you an idea of how trigger handler work. It will give you a basic understanding of it and you will be ready to understand complex design of it in my later posts. So lets begin.
Step 1: Create a Custom Metadata
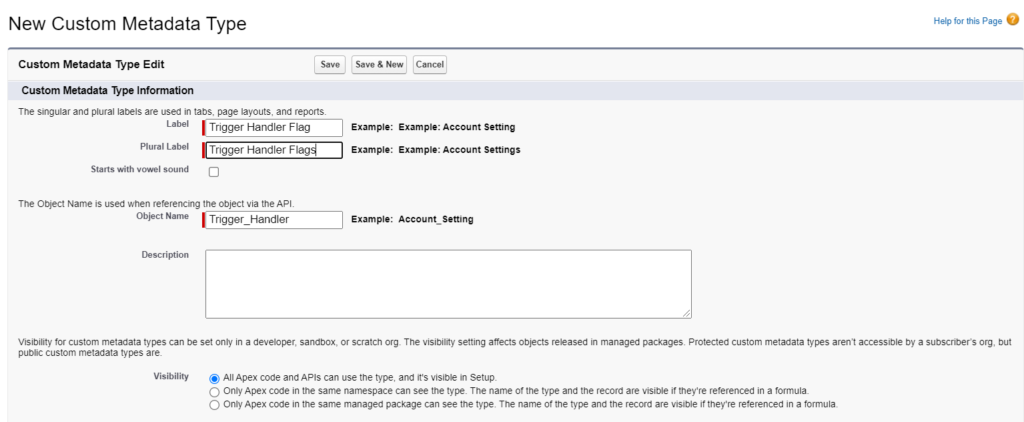
Create a custom metadata type of any name, I am using name ‘Trigger_Handler’

Step 2: Create a Custom check box field in the metadata
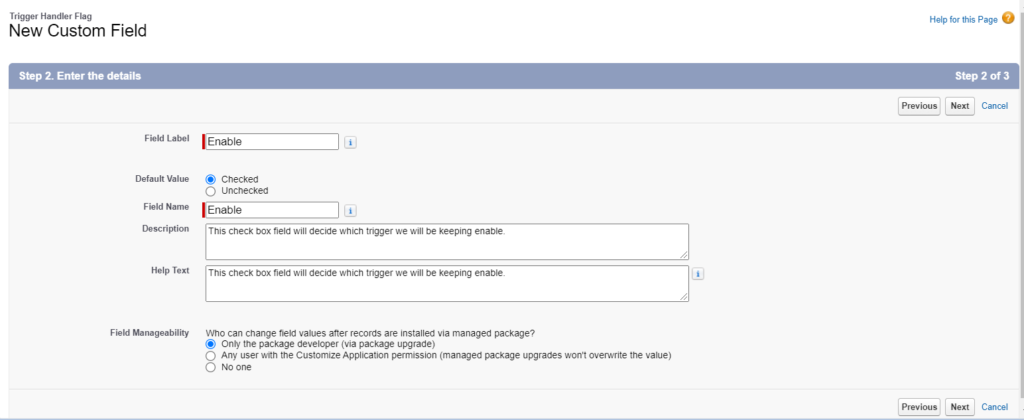
Create a new custom field of type checkbox in the metadata, don’t forget to add this field in the layout.

Step 3: Fields to be used.
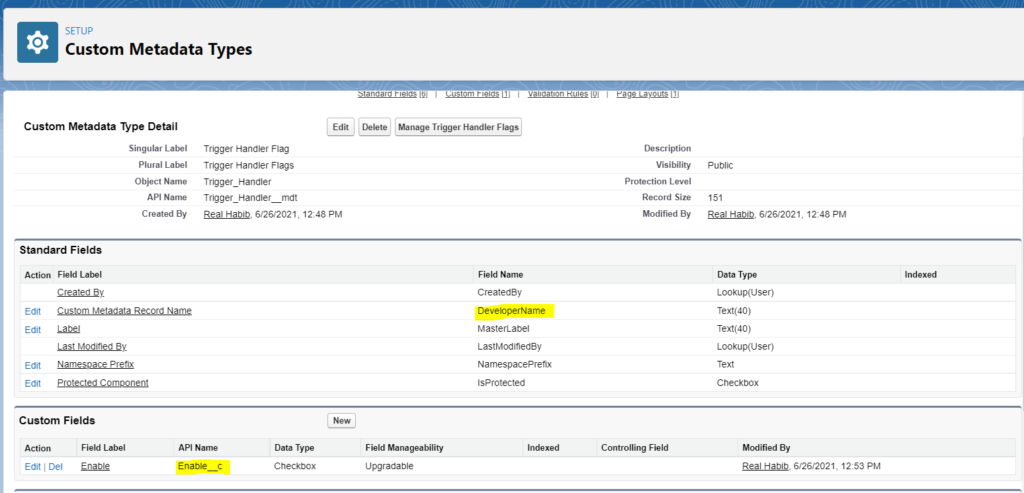
To create our first trigger handler we will be using only highlighted fields in below screenshot.
DeveloperName –> This field is standard field
Enable__c –> Custom field which created in previous step.

Step 4: Now its time to create some data.
Click on Manage data in the previous screenshot, and create your first metadata using the below-mentioned field values.

Step 5: Create custom list view to display the data.
List view creation is not important but you can create that to view all required fields on the top of page. Note that I have created one more custom metadata – Çontact-Trigger.

Step 6: Create an Apex class to declare some constants.
Remember it’s always good practice to create a class and declare all the constants you required in your project there. We will be using these two constants which are declared here in another two classes.
public class MyConstants {
    public static final String ACCOUNT_TRIGGER = 'Account_Trigger';
    public static final String CONTACT_TRIGGER = 'Contact_Trigger';
}
Step 7: Create another Apex class to pull values from the metadata we have created.
A good programmer always hides all the backend processing logic in Utility classes/Service classes and we will use this practice even in practice examples. Below utility class has logic to pull all the metadata values and it also has getter methods to provide these values to another class.
public class MyUtils {
    public static Map<String,Boolean> triggerHandlerMetadata;

    //Static Block executes first time when class is loaded.
    static{
        //SOQL Query to pull all records in the custom metadata 'Trigger_Handler'
        List<Trigger_Handler__mdt> lstMetadata = [select DeveloperName,Enable__c from Trigger_Handler__mdt];
        triggerHandlerMetadata = new Map<String,Boolean>();
        //Iterate on the list of metadata and populate map where key=DeveloperName, value=True/False
        for(Trigger_Handler__mdt triggerHandler : lstMetadata){
            triggerHandlerMetadata.put(triggerHandler.DeveloperName,triggerHandler.Enable__c);
        }
    }
    //This method returns true if flag for account trigger is set to true in custom metadata
    public static Boolean isAccountTriggerEnable(){
        return triggerHandlerMetadata.get(MyConstants.ACCOUNT_TRIGGER);
    }
    //This method returns true if flag for contact trigger is set to true in custom metadata
    public static Boolean isContactTriggerEnable(){
        return triggerHandlerMetadata.get(MyConstants.CONTACT_TRIGGER);
    }

}
Step 8: Create account trigger
This account trigger does nothing real, I have written in to demonstrate how to use flags declared in the metadata to execute code in trigger.
You can write Contact trigger as well and test the entire setup.
trigger MyAccountTrigger on Account (after insert,after update) {
    if(MyUtils.isAccountTriggerEnable()){
        System.debug('Start Executing Áccount Trigger');
        /* You should right all the actions,that you want to perfom after
         * insertion and updation of account record here, this code will
         * execute only when 'Account_Trigger flag in the metadata is true
         */
    }else{
        System.debug('Not allowed to execute any real code :( returning ..');
    }
}
Step 9: Unit testing
Unit testing this application is very easy
Case 1:
Keep ‘Account_Trigger’ value as ‘True’ and create a new account record and check logs in the developer console, you should see ‘Start Executing Áccount Trigger’ in the logs.
Case 2:
Make ‘Account_Trigger’ value as ‘False’ and create a new account record (or edit account created in the previous unit test) and check logs in developer console, you should see ‘Not allowed to execute any real code 🙁 returning ..’ in the logs.
Hope this post is helpful for you, stay tuned for a real-life example of a complex Apex trigger handler, please comment to share your feedback or discuss any technical query related to Salesforce. Thanks for going through this post.
